Is There a 3D Printed Solution to All This Snow and Ice?

For the past several days, Thingiverse.com has kindly showcased this design as a part of their front page collection. I’d like to give them a big shoutout, especially their editors/merchants. You can download this design here: Ergonomic Ice Scraper.

LIcesnse Available under CC-NC
This design was featured for multiple days by Thingiverse.com


I was inspired by the mountains of snow that fell this past week. I was so inspired, in fact, that I wanted to 3D print my own ice scraper. It turns out, there isn’t a great ice scraper on www.Thingiverse.com. The great thing about 3D printing is a solution is always near at hand. So I whipped up a design late Saturday night / early Sunday morning. Five hours later, I had a functional design.

Pen and ink drawing.
A five minute sketch of the original concept.
An early, spline based draft of the overall design.
With the design finished, engineering goes into place.

Once the design itself was complete, I did a full render to visualize the finished product. It looked pretty good, so I sent it to Repetier Host and sliced it up using the excellent Slic3r project.

A last look at the digital version of the ice scraper.
Pre-flight for the 3D print on a heavily modified Solidoodle 3.

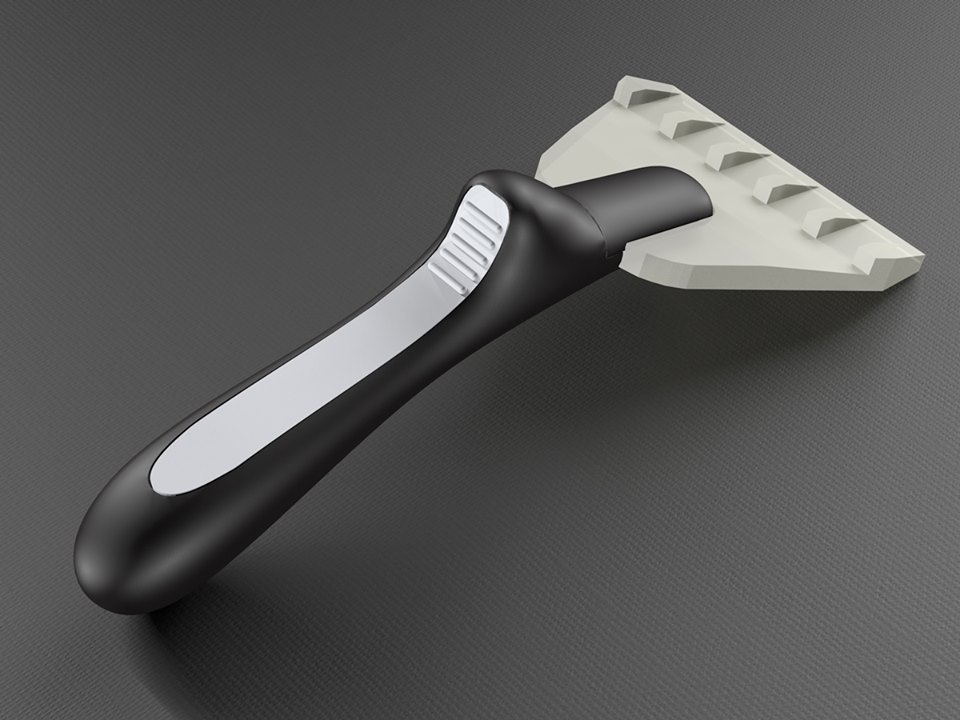
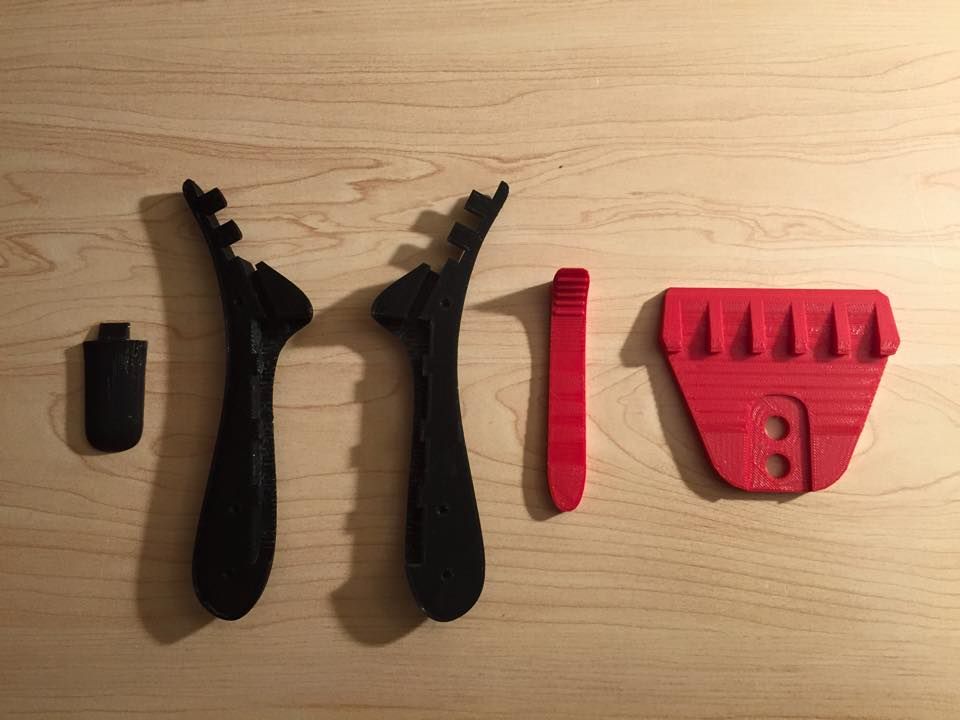
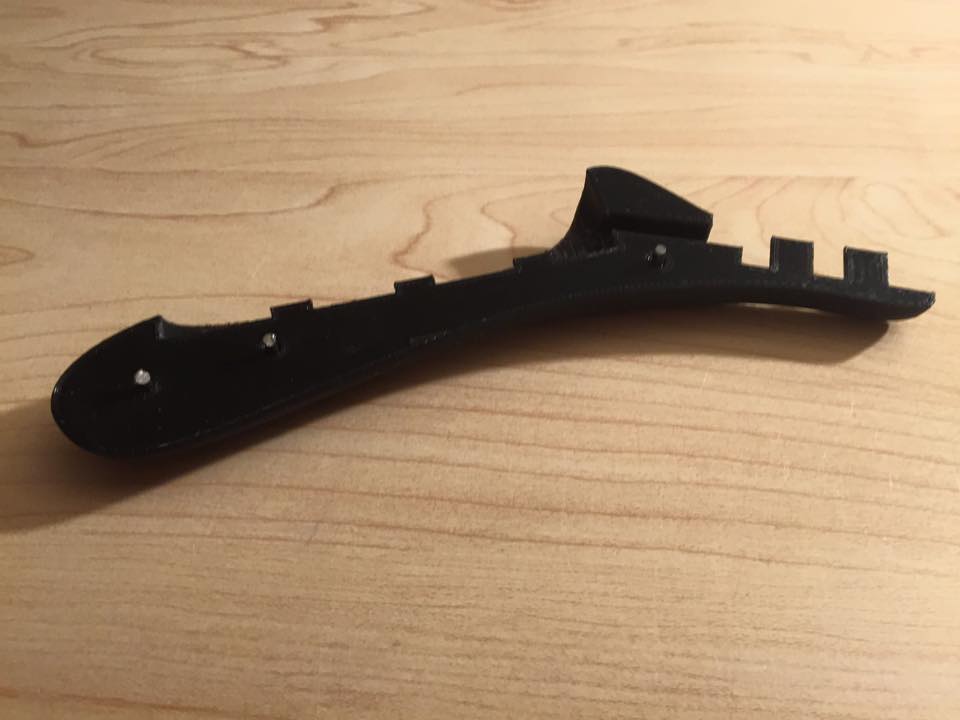
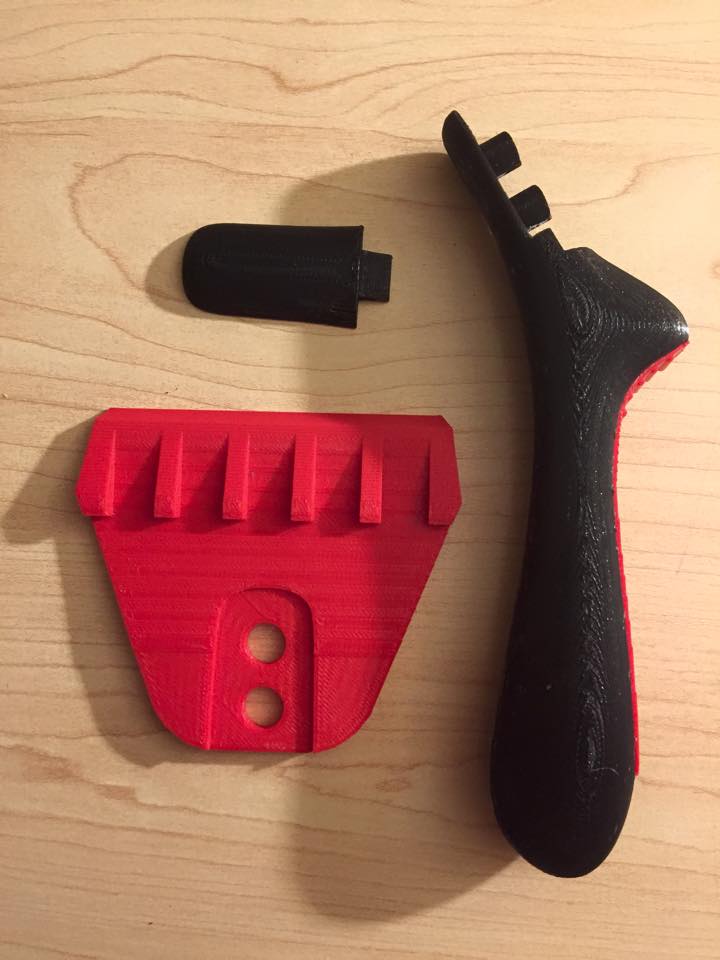
The print proceeded without too much trouble. I’ve been printing with Makerbot’s black and it doesn’t like cold or passive printing so much. I’ve just reordered some PLA with ColorFabb in Holland. I expect it to run a little colder. Once all the printing was complete, I took a look at the parts. I included voids for three steel pins. The pins help align the prototype and add a tiny bit of heft to the handfeel.

One half of the handle in progress.
All five printed parts for the 3D printed ice scraper.
For alignment and a little weight, steel pins were added.

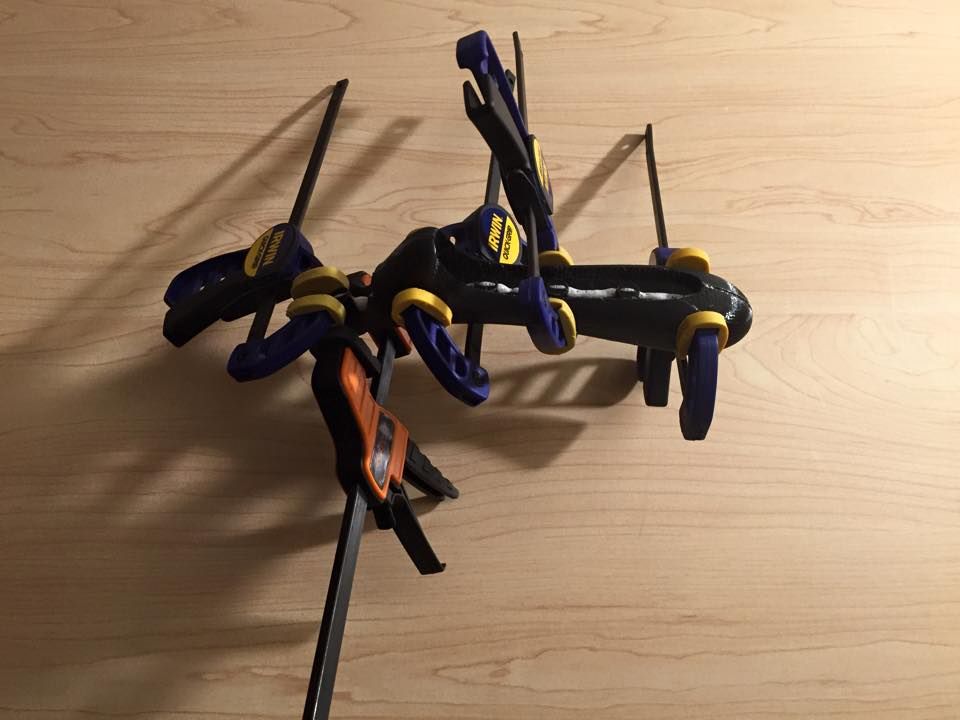
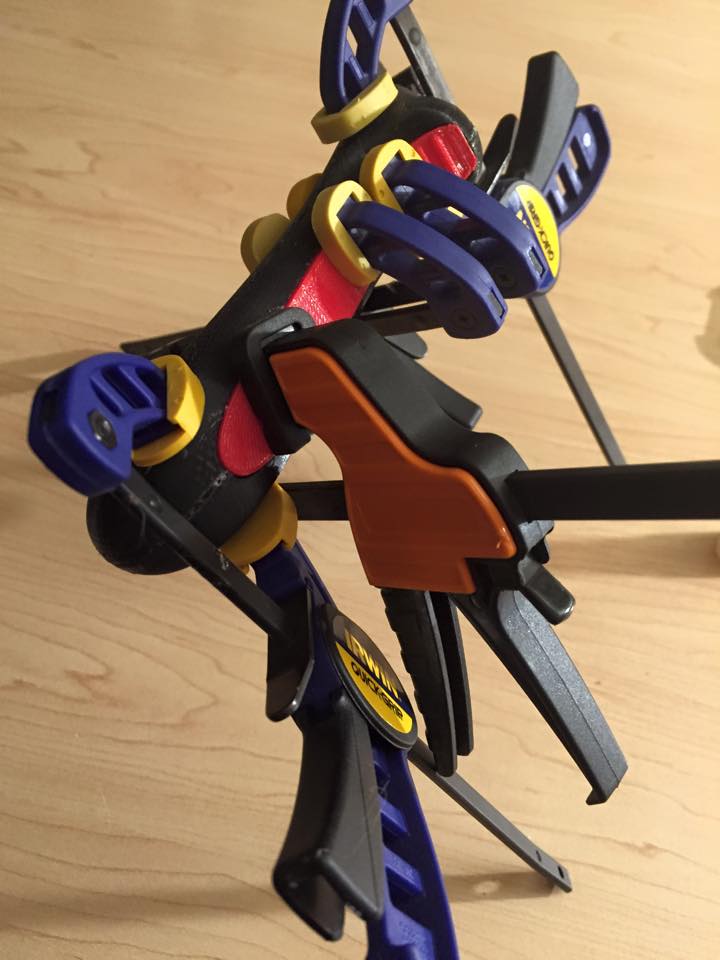
Though the finished prints held together pretty well in a friction lock, I wanted a lot of stability and permanence for this print. Gorilla Glue’s foaming glue works great on PLA, as it fills in all the subtle texture and creates a good bond. Once glued, I clamped the parts for thirty minutes per glue-up.

The first round of clamping for the handle itself.
Another round of clamping for the backstrap.

At this point, it was getting very exciting. The handle was fully glued and assembled, bringing the project to a simple three parts. On a dual-extruder printer, this could have been printed in a single pass (with supports) but I got a nice finish and a lot of strength by parting it out.

The assembled handle, blade, and cap.

Assembly was a breeze and the full project came together with no incremental prints or re-engineering – a rare treat! It can be easily scaled to fit any users’ hand and costs about $3.15 in plastic and glue (at retail prices). Totally worth it – the cheapest Amazon ice scraper was $3.99! In all seriousness, it’s amazing how effective a 24 hour design project can be for even the most utilitarian of tools.

Fully glued up, assembled, and drying.
The finished product in hand!

If you’ve made it to the end of the post, here’s two bonuses: a video of it in action (see below) AND a link to the live files on Thingiverse.com. I’ve shared them under the CC-No-Commercial license. That means you’re free to print and distribute my designs with attribution, as long as you do not use them for commercial purposes. Enjoy and happy prototyping!

DESIGN – http://www.thingiverse.com/thing:674723

VIDEO – https://plus.google.com/115787153901365137692/posts/A34remhsos6

EasyInvite 1.4 has Shipped!

The new release of EasyInvite will be coming in the first week of June, 2014.

In the first week of June, I launched  version 1.4 of EasyInvite.com. This release has a lot of improvements based on feedback from users and direct user testing. One of the things we’ve designed for in this release is a fluid dynamic between importing and editing guests. A new import system and bulk selection tools should really help users get their guests managed quickly.  We put together a basic screencast on the new features here: EasyInvite 1.4 New Features. 

Event planning has a lot of change over time and our improvements should help get the interface out of the way of what users actually want to do.

And after all, that should be the goal of a good experience: enable the user to do what they need to do.

Quickstack Battery Holder Design Selected for Expert Review!

Exciting news on industrial design and product development efforts: the community on Quirky selected the battery holder (see previous post here) for expert review, putting it in the 90%+ percentile of product concepts on the website.

The post on Quirky can be found here – we now will have to wait as much as a month to find out if the Quirky team is interested in supporting the product’s mass market development. Only a few products ever actually make it into production but as it stands, the battery holder’s already threaded a narrow needle.

The front side of the AA battery holder.

Rapid Prototyping: Battery Holders!

I’m fortunate to get to play with technology at home and at work. Part of product development includes prototyping objects. 3D printing is especially cool because the prototype itself can be sold, particularly if it has obvious utility. I was scrounging around my house, looking for a few AA batteries, and frustrated that my off-the-shelf battery holder from Amazon only held a few of each type. The Amazon holder limited me to buying a product that didn’t serve my needs and forced me to buy more to hold a reasonable number of batteries. Not to mention that it was quite ugly.  I realized I could solve this issue right at home. I sketched up a few concepts until I realized one that worked.

A concept sketch for the 3D printed battery holder

It’s amazing to me how fast I can work with the entire prototyping chain in my office – my home office! The entire development cycle, from concept to product, took about 24 hours. The finished “home” product was a AA version in white and green.

The front side of the AA battery holder.
The back side of the AA battery holder.

I eventually posted it here on Etsy.com where we got a few sales. We developed two more common sizes (AAA and C) and put those up on Etsy as well. We also published the project here at Quirky.com. While it’s certainly viable as a product straight from the 3D printer, we think it’s also a pretty good candidate for mass market. Scaling a product like this can be expensive so Quirky represents a really great opportunity to get direct consumer feedback as a prototype and, if selected, scale with an experienced partner.

The design iterations happened in a really user-centered way. We realized quickly that a holder alone was nice (if it was attractive and held a fair bit) but the ability to choose which types of batteries – and how many! – was even more important. We altered it to be easily stackable and improved the wall mount design. For the 3D printed version, we bind the whole thing together with high heat glue (which is almost as hot as PLA or ABS in 3D and creates a great bond).

The whole project was a good reminder that development doesn’t have to be expensive, long, or complicated and that our better ideas come from a source of environmental inspiration.

EasyInvite 1.3 Released!

One of my large projects is EasyInvite.com, the web application behind Checkerboard, Ltd.’s Future of Inviting™. In this newest release we’ve added some great features. Our new spreadsheet importer is incredibly versatile. It allows the user to preview their spreadsheet data and assign attributes to that information, rather than requiring adherence to a template. New preview features and a significantly simplified interface are also big improvements. You can watch a video of the new version here: a four minute walkthrough of the new EasyInvite.

Just shipped the new version of EasyInvite.com


Rapid Prototyping: Adjustable iPad Holder and Charger

This is an iPad 2/3 holder and charge that can be adjusted for optimal viewing angles. I designed and engineered the project in C4D, which is a great blend of tools for modeling and visualization. All that is required is an off-the-shelf Apple charging cable and a FFF printer. There are five parts: a primary adjustment dial (which also serves as the drive), a worm gear that connects to the dial and actually makes the adjustments, the cover, base, and a cable guide. The cable guide helps the design aesthetically by bringing in the second color but it also allows the user to change the type of cable (Apple now has two) based on the type of iPad they use.

Future versions will include channels for the original iPad, as well as the iPad mini, and iPhones. The finished project can be found on Thingiverse, or by clicking here!

This holder and charger is an original design.
A quick snapshot of the finished, fully adjustable iPad holder and charger


Interactive Name Plates

There is so much rapid prototyping technology readily available that sometimes it’s overwhelming how quickly we can alter “traditional” products. Here’s a project I recently completed that puts a new light on name plates. It’s a fully customizable name plate. Users can customized the color of the plate itself and the name. It’s also interactive. It has two modes of operation. The first mode is a fully lit mode. Makes the name plate light up, backlighting the name. The second mode is interactive. It automatically turns the backlighting on depending upon the light level of the room, and dynamically adjusts to its surroundings. It is a completely original design, including the circuit. The chips were custom designed and milled for this project. Most iterations took less than a day to turn out a prototype. You can buy these little guys here, at Etsy, in the Checkerlabs Store.

The name plate dynamically reacts to the lighting conditions it is in.
The front of the name plate is fully customizable.
A close up of the custom name, in the "off" mode.
A close up of the custom name, in the “off” mode.
The mode switch and photo "sensor."
The mode switch and photo “sensor.”
An example of the internal armature.

Reinventing Invitations

Invitations haven’t changed much in the past seventy years. Our challenge was to reinvent the traditional invitation and I led our team through a communication adventure.
The Future of Inviting™ by Checkerboard, Ltd. is a cross-media product line that combines the impact of physical communication with the convenience of digital services. Our current design combines address management, a feature to help you find your addresses, RSVP management, and guest management.
This was launched in April through Checkerboard, Ltd.’s national and international dealer channel and became the most popular purchase at its tradeshow launch in three years of attendance by the company.

EasyInvite.com is the engine behind the Future of Inviting™.